In the west coast of the United States we had a total lunar eclipse, and at the Chabot Space and Science Center we made an event out of it. And as is my style, I was there with my telescope and camera trying to capture the event. I took a lot of images with the idea of making a time-lapse video, but I think that is not going to work out because there were a lot of clouds coming in and out, distorting the view. I could probably still smash something together, but it will probably be too choppy to really work out. (I might change my mind later.) So for now I am going to just put together some highlights.
For starters, here is an image of the moon before the partial eclipse starts. It is already in the penumbral phase, so there is a little bit of fading on the lower left edge. That is where the umbra will contact the moon when it gets there. I also need to point out here the glow all around the image of the moon. That is from the weather that day. It was a humid night with high, thin clouds. It is the moonlight on the high clouds that is causing that glow around the moon. That's too bad. Many of the images were completely washed out as thicker clouds passed in front of the image. There is nothing to be done, it's the conditions and we have to live with it. Keep this in mind with all the images that follow.
Now the eclipse is starting. That bite on the bottom left is the shadow cast by the planet Earth. The moon is moving down and to the left into the shadow and it will take about an hour to completely enter the shadow. The moon, in its orbit around the Earth, moves noticeably through the night sky, and my rule of thumb is that it moves about one moon diameter in one hour.
Look carefully the shape of that shadow. Note that it is curved and fuzzy. The curve is the curvature of the Earth (It's round!) and the fuzz is the distortion of the edge of the shadow by our atmosphere. There is probably a bit of that glowing humidity in there too:-(
Further into the partial eclipse, and it's looking pretty good. The weather is improving so the image it noticeably sharper. Note that the curve of the Earth's shadow is pretty gradual. That's significant. Imagine what this means to someone standing on the surface of the moon. It is pretty clear from this that the Earth in that person's sky will look much bigger than the sun. It would clearly dominate the sky.
Also, while we're thinking about such things, you'll be noticing that the Earth will always be stationary in the moon-person's sky, so this eclipse will appear like the sun is moving behind the Earth. The dark, night time, Earth. Kool!
Now we're getting somewhere! I adjusted the position of the camera here, so now the Earth's shadow is on the upper left. The eclipse is almost total, but there is just a tiny bit of lit Moon on the right side.
The whole image looks pretty dark, there is not much light coming back from the moon. (Also, those pesky clouds, although they're not too bad in this image.) You can start to see a gradient of color from the white that is lit, through to the orange. This gradient is in the other images as well, but the red is so much fainter that we can't really see it. In fact, the exposure is much longer for this image than that for the previous images. (2sec shutter, ISO1600). Looking without the telescope is giving a similar experience, as one's eyes start to night adapt.
And this is the main event. This is as close to totality as we were able to get. Shortly after this, the clouds got so thick that we couldn't see it anymore.
The moon didn't pass through the center of the Earth's shadow, but instead passed through the bottom half. So given the shadow is fuzzy, there is some bit of lighting on the bottom edge, so we get this rainbow of color, from blue-white through orange to deep red. It probably got deeper red over time, but the weather was not kind.
You may notice that this image is not as bright (read: saturated) as many other images you will see on the 'net. It is common to brighten images of lunar eclipses to bring out the color, but the images I'm posting here are close to how I actually experienced them. I like doing it this way.
Steve's Astronomy
I sometimes take on little astronomy projects, or simply have something to say about astronomy, space science, science in general, or whatever. Sometimes, this is in the context of my volunteer work at the Chabot Space and Science Center.
Thursday, April 17, 2014
Sunday, October 21, 2012
Gobs and Globs of Stars - Messier 5
Globular clusters are interesting. Surprisingly interesting, actually. Globular clusters are dense clumps of stars, usually hundreds of thousands of stars--much more than a typical open cluster. Also, obviously, they are packed into a tight glob. That is how you visually tell an open cluster from a globular cluster. (Duh:-) But the most interesting thing about them is where they are found.
But first, this is a picture of the globular cluster Messier 5:
Messier 5 / 20" refractor (Rachael) / Stephen Williams |
This picture was taken through the 20" refractor (Rachael) at the Chabot Space and Science Center. As usual, I used a Nikon D80 camera set up at the prime focus. Whereas the planetary pictures I've posted in the past are assembled from dozens of frames stacked together, this image is actually only 2 30second exposures, stacked to get the equivalent of 60seconds of exposure time. I actually took dozens of shots that night, then culled them down to just the two best images, and stacked them.
So the interesting thing about these globular clusters is as much where they are as what they are. All the globular clusters are in the halo that surrounds galaxies. Spiral galaxies like our own Milky Way are surrounded by an extended, faint halo made up mostly of these globular clusters. All of the globular clusters are in the halo, none are found in the main body of the host galaxy. And these are a common feature of large galaxies as we can see these globular clusters in the halos around other galaxies as well.
Another interesting thing is the age of these clusters, or more specifically the age of the stars in the clusters. The stars in a globular are mostly ancient--as old as the host galaxy itself. New stars are not being born in these clusters since all the free gas has been sucked up into the existing stars. Furthermore, the stars in a globular cluster like M5 are mostly "Population II" stars, meaning they contain very little of the elements heavier then helium, which suggests that the stars are made from primitive material of the universe, and not from material recycled from other stars. The globular clusters are therefore probably formed along with the galaxy, are likely a consequence of the process that form galaxies in general, and are not typically sharing material with the host galaxy. In particular, the Milky Way has a much higher proportion of heavier elements (i.e. carbon, silicon, oxygen, etc.) so while the material within the Milky Way is being recycled and remade into new stars as the older ones die, The globular clusters have made their stars and are not recycling them.
These globular clusters are like fossils of the ancient universe, from a time when our own galaxy was busy forming. This is pretty interesting.
Sunday, July 22, 2012
Venus Dancing on the Sun
It's been almost two months since the last Venus transit this century. Fortunately, I collected a huge stack of imaging data. I posted a few key images in my "Black Drop" post last month, but all along I planned to make a time lapse video; and I finally uploaded that hand assembled video. Here it is, but I recommend following the link and viewing it at the YouTube site. The JPEG artifacts of this embedded version are not as bad there. More about this video below.
Labels:
chabot observatory,
sun,
venus,
venus transit
Location:
W Ridge Trail, Oakland, CA 94611, USA
Saturday, June 30, 2012
Rings of Saturn
My ongoing adventures with astrophotography at the observatories at Chabot Space and Science Center bring me this time to Saturn. Amongst other things, we've been viewing the ringed planet during our night-time public viewings, and one Saturday I managed to get the telescope for myself for an hour to do my thing with the camera. I'm getting practiced with photographing through the 20" refractor (Rachael). Here's the image:
As with all my shots, this is taken with a Nikon D80, prime focus. And like my other shots, this was not a single exposure but a collection of exposures (about a dozen) that were stacked to brighten the image and reduce ISO noise.
This particular day, the seeing wasn't perfect. That is, although it was perfectly clear and the image nice and bright, the image jumped around and distorted a lot, so that leads to motion blur. I tried to keep the exposures short; I tried 1/6 second and 1/15 second speed, and stacked the best images; but even so, this is what I get. That's my excuse for the image above looking just a little bit out of focus. But that said, the results are pretty good, and there are some interesting details.
First of all, you can see some bands across the main disk of the planet. They run around the planet, and follow the "trade winds" that encircle the planet at high altitudes. Saturn's colors are not as dramatic as Jupiter's, so the bands are not as dramatic, but they are there, and the causes are pretty much the same.
Of course, everybody thinks about those rings when thinking about Saturn. The most obvious feature is a gap called the Cassini Division, so named because it was discovered by Giovanni Cassini in 1675. The division, and other fainter divisions, look like grooves on an (old fashioned) vinyl record and separate the disk that would otherwise be a single ring into several rings. We know from spacecraft that have visited Saturn that the gaps are created by tiny moons that clear out the space between the rings and shepherd the rings into bands the that we see.
If you look carefully, you can also see to the left and behind the planet a gap across the rings. That is the shadow of the main planet cast across the rings. (The Sun is behind our back and to the right.) And if you look real close, along the bottom edge of the ring, where the ring passes in front of the planet, you can see a narrow dark line that is a shadow cast by the rings onto the body of the planet. All that gives you a sense of perspective, doesn't it?
This is just about the same view you would have seen if you were with us looking directly through the telescope. In fact, with your eyes, you would have been able to see some of Saturn's moons, too, but the moons didn't make it into this picture. The camera doesn't have the dynamic range that your eyes have, so the moons were either too faint to be seen by the sensor, or washed out by Saturn's glare. Oh well. In another session, I might try to get a shot of the moons. I'll have to think about how to do that.
Saturn 2012-06-16, CSSC 20" refractor (rachael) |
This particular day, the seeing wasn't perfect. That is, although it was perfectly clear and the image nice and bright, the image jumped around and distorted a lot, so that leads to motion blur. I tried to keep the exposures short; I tried 1/6 second and 1/15 second speed, and stacked the best images; but even so, this is what I get. That's my excuse for the image above looking just a little bit out of focus. But that said, the results are pretty good, and there are some interesting details.
First of all, you can see some bands across the main disk of the planet. They run around the planet, and follow the "trade winds" that encircle the planet at high altitudes. Saturn's colors are not as dramatic as Jupiter's, so the bands are not as dramatic, but they are there, and the causes are pretty much the same.
Of course, everybody thinks about those rings when thinking about Saturn. The most obvious feature is a gap called the Cassini Division, so named because it was discovered by Giovanni Cassini in 1675. The division, and other fainter divisions, look like grooves on an (old fashioned) vinyl record and separate the disk that would otherwise be a single ring into several rings. We know from spacecraft that have visited Saturn that the gaps are created by tiny moons that clear out the space between the rings and shepherd the rings into bands the that we see.
If you look carefully, you can also see to the left and behind the planet a gap across the rings. That is the shadow of the main planet cast across the rings. (The Sun is behind our back and to the right.) And if you look real close, along the bottom edge of the ring, where the ring passes in front of the planet, you can see a narrow dark line that is a shadow cast by the rings onto the body of the planet. All that gives you a sense of perspective, doesn't it?
This is just about the same view you would have seen if you were with us looking directly through the telescope. In fact, with your eyes, you would have been able to see some of Saturn's moons, too, but the moons didn't make it into this picture. The camera doesn't have the dynamic range that your eyes have, so the moons were either too faint to be seen by the sensor, or washed out by Saturn's glare. Oh well. In another session, I might try to get a shot of the moons. I'll have to think about how to do that.
Saturday, June 9, 2012
The Black Drop
The recent Venus transit is a great opportunity to take a look at a phenomenon that has plagued astronomers for hundreds of years. In fact, there is a bit of history to the black drop effect; there are reports of this effect that go back to the early days of transit observations, including drawings of the stages of a Venus transit by Captain James Cook and Charles Green from observations they made in 1769. The black drop effect spoiled attempts to very accurately time the ingress of Venus, and set back efforts to improve measurements of the Earth's distance to the sun.
This year we got to look for the effect ourselves with the June 2012 transit, and among the huge stack of images I collected during the Chabot Space and Science Center event were these images. Notice the sun spots scattered around the disk of the sun, and the perfectly round nibble near the top edge.
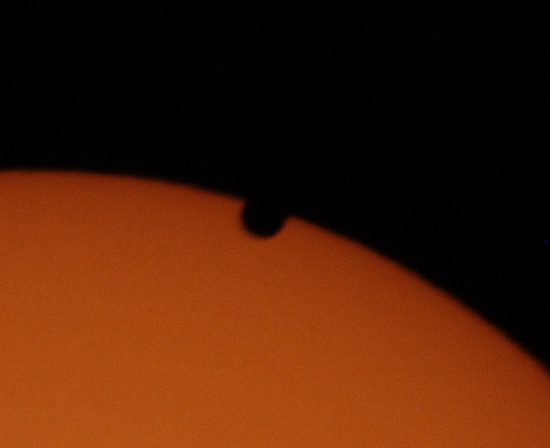
These are zoomed out lots. So lets look closely at the first image. These next images are cropped from the previous images where Venus is entering the disk of the sun, then zoomed in a bunch.
Do you see it? Notice how the points where the edge of the disk of the sun and the edge of the disk of Venus meet. There should be sharp points there, but instead, it is rounded. Here is the same zoom from the later image.
This time Venus is far enough in that it should be surrounded by the yellow of the sun, but there is still that rounded opening. It is as if Venus is a drop of black fluid (oil?) falling into the fluid of the sun. Of course that's not the case, we know that Venus is a planet and the sun is the sun, so this black drop is an optical effect of some sort.
There have been a variety of explanations of this effect offered up, including:
This year we got to look for the effect ourselves with the June 2012 transit, and among the huge stack of images I collected during the Chabot Space and Science Center event were these images. Notice the sun spots scattered around the disk of the sun, and the perfectly round nibble near the top edge.
Venus Transit, 5 June 2012 |
Do you see it? Notice how the points where the edge of the disk of the sun and the edge of the disk of Venus meet. There should be sharp points there, but instead, it is rounded. Here is the same zoom from the later image.
This time Venus is far enough in that it should be surrounded by the yellow of the sun, but there is still that rounded opening. It is as if Venus is a drop of black fluid (oil?) falling into the fluid of the sun. Of course that's not the case, we know that Venus is a planet and the sun is the sun, so this black drop is an optical effect of some sort.
There have been a variety of explanations of this effect offered up, including:
- Venus has an atmosphere that must be distorting the image and causing the effect, or
- The Earth's atmosphere is distorting the image, or
- Limb darkening combine with instrument effects.
Monday, May 28, 2012
Solar Eclipse Time Lapse Video
I've finally managed to pull it off, although there was a lot of manual labor involved. I collected all the pictures that I took during the 20 May 2012 solar eclipse and merged them into this time-lapse video.
These pictures were taken through my 120mm f/8.3 telescope from the observatory deck at the Chabot Space and Science Center. I set up the camera (connected to a computer) to capture a frame about every 25 seconds, and let it fly. You can see the eclipse from the beginning until the sun got lost in the trees near the horizon. There are even some sunspots on the surface of the sun, just to prove it's real:-) You can see that the moon passes a little above center, so this counts as a partial eclipse, but it is complete enough that you can clearly see that even if the moon were to have passed right over the center of the sun, it would not have covered the entire sun. This is what makes it an annular eclipse.
I used gimp (on Linux) to crop and align all 300 frames, then I used ffmpeg to combine the frames into a video stream. Of course I have all the original images, which at full resolution look a little better then individual frames of the video (no jpeg artifacts) but the video really does give one a good sense of what is going on. The embedded video above looks pretty good, but I suggest clicking the "YouTube" button to watch the highest resolution version on YouTube. There, the quality is good enough that you can watch various sun spots as they are covered by the moon passing by. Those sunspots show up even better on the full-resolution stills, so I may post more of those.
This video gives a nice bit of perspective. While watching the eclipse live, the pace is such that it is a little less obvious what exactly is going on. While we obviously know what's happening, this video makes it more visceral. I like that. So here you go, and enjoy.
Next project is to do the same thing for the Venus transit. Let's hope the weather cooperates for that.
Labels:
chabot observatory,
solar eclipse,
sun
Location:
W Ridge Trail, Oakland, CA 94611, USA
Thursday, May 17, 2012
Our Mother Star
There is going to be an annular eclipse of the sun this Sunday, 20 May 2012, and Venus is going to transit the sun on 5 June, 2012. Two very different, yet very similar events! In both cases, a nearer astronomical body (moon or Venus) is going to pass between Earth and the sun. The moon will cover a big piece of the sun, so we get an "eclipse." The moon is obviously not as big as the sun, but it is so much closer that it appears almost as big as the sun (we call that "angular size") and we get eclipses. This particular eclipse will be partial in the Oakland, CA area. Even though Venus is much bigger then the moon (it is about the size of the Earth) it is much farther away, so when Venus transits the sun it will cover only a small fraction of the sun from our point of view. It will not cover enough of the sun to make the sky darker, but we will be able to clearly see it with a filtered telescope, and we might be able to see it without the telescope. (But still filtered!)
I want to catch and photograph both events, so I have collected some equipment and have put some effort into dry runs. For the solar eclipse, I want to be able to watch the moon take a bite out of the sun, and for the Venus transit, I want to be able to watch Venus crawl across the face of the sun. For the Venus transit I'll need some magnification and filtration, and for the solar eclipse I'll need at least some filtration. So I've decided that I'll use the same setup for both events. This will be my 120mm refractor telescope and my Nikon-D80 camera. And of course, a filter.
I have two possible filters. Both go on the front of the telescope (over the main lens) and both reflect most of the light away to leave only a small amount to go through the telescope. The light that gets through the filter and into the telescope is focused into a magnified image, and will still be bright enough behind the filters to use short exposures. Which filter looks better and which exposure settings work best are the point of my experimentation.
I have two types of solar filters: a Type-IIa glass filter and a typical aluminized mylar filter. They both were purchased to match my telescope, so the filter frame fits over the glare shield of my telescope. (It is important that the excess light is rejected before it enters a telescope. An eyepiece filter will burn.)
I took a bunch of images with each of the filters, and here are representative images, one using each filter type. The first image is taken through the film filter. This looks pretty good. You can see the sunspots clearly and it is bright even at ISO500, 1ms exposure. It also has a distinct blue/purple tint to it. I wonder what I think about that.
The second image is a representative image taken using the glass filter. Again you can easily see the sunspots, but in this case the color is a yellowish orange. Shorter exposures made it look a little red, and longer exposures looked yellower.
From the bunches of images, these two were typical from each filter. Both images use the same exposure settings, so the differences are entirely the differences between the filters. I'm looking for brightness and sharpness. Brightness might be an issue if I find I'm forced to take a long exposure, but both are bright enough (the images above were taken using 1ms exposure time) and neither filters seem to distort the image any, so those are not criteria for choosing one image over another.
Ultimately, I think this is going to be a matter of taste, and not science. Which looks better? To my eye, the glass filter looks better because the color looks more realistic. Technically, the blueish white image from the film filter may be more correct, in that the spectrum getting through is more uniform, but this is not going to be a scientific endeavor and we humans think of the sun (incorrectly!) as reddish yellow. So for the purposes of making pretty pictures that give the right impression, I think I'm going to go with the glass filter.
Of course, the moon (or Venus on the day of the transit) will be black so that's not an issue for either filter. I guess I'm ready to go. Now the planets need to do their part. And by the way, I'll be setting all this equipment up on the observatory deck at the Chabot Space and Science Center on the appointed days. Join us!
I want to catch and photograph both events, so I have collected some equipment and have put some effort into dry runs. For the solar eclipse, I want to be able to watch the moon take a bite out of the sun, and for the Venus transit, I want to be able to watch Venus crawl across the face of the sun. For the Venus transit I'll need some magnification and filtration, and for the solar eclipse I'll need at least some filtration. So I've decided that I'll use the same setup for both events. This will be my 120mm refractor telescope and my Nikon-D80 camera. And of course, a filter.
Type-IIa glass on left, film on right |
I have two types of solar filters: a Type-IIa glass filter and a typical aluminized mylar filter. They both were purchased to match my telescope, so the filter frame fits over the glare shield of my telescope. (It is important that the excess light is rejected before it enters a telescope. An eyepiece filter will burn.)
I took a bunch of images with each of the filters, and here are representative images, one using each filter type. The first image is taken through the film filter. This looks pretty good. You can see the sunspots clearly and it is bright even at ISO500, 1ms exposure. It also has a distinct blue/purple tint to it. I wonder what I think about that.
Sun using film filter |
Sun using glass filter |
From the bunches of images, these two were typical from each filter. Both images use the same exposure settings, so the differences are entirely the differences between the filters. I'm looking for brightness and sharpness. Brightness might be an issue if I find I'm forced to take a long exposure, but both are bright enough (the images above were taken using 1ms exposure time) and neither filters seem to distort the image any, so those are not criteria for choosing one image over another.
Ultimately, I think this is going to be a matter of taste, and not science. Which looks better? To my eye, the glass filter looks better because the color looks more realistic. Technically, the blueish white image from the film filter may be more correct, in that the spectrum getting through is more uniform, but this is not going to be a scientific endeavor and we humans think of the sun (incorrectly!) as reddish yellow. So for the purposes of making pretty pictures that give the right impression, I think I'm going to go with the glass filter.
Of course, the moon (or Venus on the day of the transit) will be black so that's not an issue for either filter. I guess I'm ready to go. Now the planets need to do their part. And by the way, I'll be setting all this equipment up on the observatory deck at the Chabot Space and Science Center on the appointed days. Join us!
Subscribe to:
Posts (Atom)